
Setup Prescription Defaults?
Step-by-step guide for configuring Prescription Defaults within Pharmacy Defaults in SiCompounding.
Overview
Prescription Defaults are configured within Pharmacy Defaults, a core component of Pharmacy Settings. These defaults control how prescriptions are labeled, verified, processed, and automated throughout SiCompounding.
Important: Pharmacy Settings, including Prescription Defaults, must be completed before using any other area within SiCompounding to ensure correct workflows, compliance, and document generation.
Pharmacy Defaults
Pharmacy Defaults include multiple configuration sections that define system-wide behavior:
- Prescriptions
- Orders
- Inventory and Purchase Orders (PO)
- Patients
- Formulas
- Compounding
- Scales Integration
- Invoices
- Positive Identification
- SiBot
- EDI Settings
- Surveys
- Shipment Groups
Each section must be reviewed individually and configured according to pharmacy requirements.
Accessing Prescription Defaults
Step-by-Step Navigation
- Click the FileMaker Pro icon to open FileMaker.
- When FileMaker opens, locate the large menu bar on the left side of the window.
- Click SiCompounding (near the top of the menu).
- In the next window, several icons appear across the middle of the screen.
- Click Pharmacy to open the Pharmacy Dashboard.
- From the blue sidebar menu on the left, select Settings (located at the bottom).
- Under General Settings, select Pharmacy Defaults.
- From the dropdown list, choose Prescriptions.
Labels / Statements (Tab 1)
This tab defines default labels and statements applied to prescriptions. Correct configuration is critical to ensure compliance and label formatting accuracy.
Default Labels

Select the appropriate label from the dropdown for each prescription process:
- RX Label
- RX TPN Label
- RX Vitamin Mixture Label
- RX Studies Label
- RX Auxiliary Label
- RX Insurance Label
Best Practice: Each label must be specifically designed for its intended process to ensure correct size, layout, and regulatory content.
Default Statements
Statements are printed on prescription labels and must fit within the label size and parameters:
- Compounding Drug Statement

- FDA Statement

- Clinical Trial Statement

Settings (Tab 2)
The Settings tab controls verification logic, alerts, regulatory enforcement, and automation behavior.
Verification Defaults

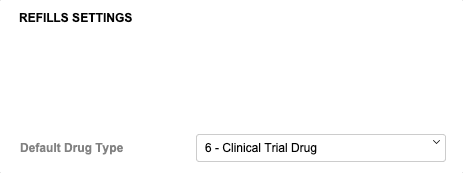
Refill Settings
- Select the default drug type for new prescriptions (dropdown).
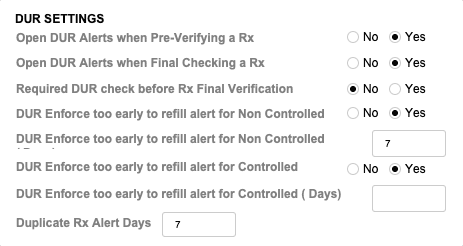
DUR Settings
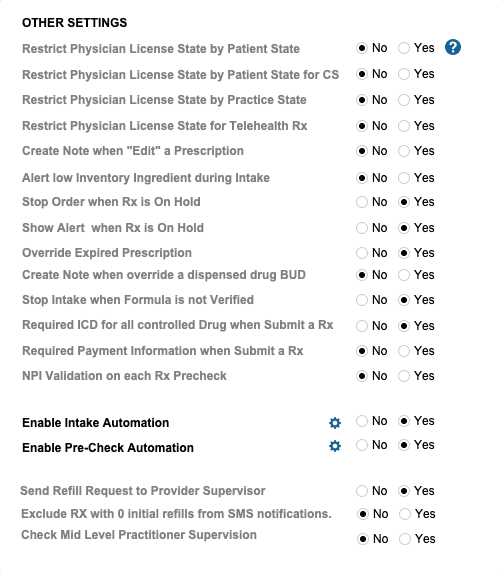
Other Settings
Telephone RX Templates (Tab 3)

Telephone RX Templates define standardized communication formats for telephone prescriptions.
Creating a New Template
- In the Telephone RX Templates tab, click the + Template button.
- Select the Template Type (dropdown).
- Enter the Template Name and Template Description.
- Enter the Subject and Body format.
- Add CC and/or BCC recipients if needed.
- Click Save when finished.
Managing Existing Templates
- Use the Search Title box to locate a template.
- Under the Actions column, select one of the following:
Edit
- Opens the Communication Template window.
- Update Template Type, Name, or Description.
- Edit the Subject or Body format.
- Click Save when completed.

Change Logs
- Opens the Record Modification Log.
- Displays a list of changes made to Communication Templates.
- Review changes and click Save when finished.
Pharmacy Settings (System Foundation)
Pharmacy Settings provide the foundational templates and defaults required for system operation. These settings must be completed before using other areas of SiCompounding.
Best Practice: Enter all available and required data for each section and subsection to ensure proper system behavior, compliance, and reporting across SiCompounding.
Summary
Properly configuring Prescription Defaults ensures consistent prescription processing, regulatory compliance, accurate labeling, and efficient automation across SiCompounding.