
Where's My List of SIG Codes?
Step-by-step guide for managing SIG codes in SiCompounding.
Overview
SIG codes are standardized abbreviations used by prescribers and pharmacists to communicate prescription instructions efficiently. These codes ensure clarity, consistency, and compliance in prescription labeling and medication administration directions.
Navigation Path
Settings → Codes and Classifications → SIG Codes
Step-by-Step Instructions
1. Open FileMaker Pro
- Click the FileMaker Pro icon on your computer to launch FileMaker.
2. Access SiCompounding
- When FileMaker opens, locate the large menu bar on the left side of the window.
- Click SiCompounding (near the top of the menu).
3. Open the Pharmacy Dashboard
- In the next window, several icons will appear across the middle of the screen.
- Click Pharmacy to open the Pharmacy Dashboard.
4. Open Settings
- From the blue sidebar menu on the left side:
- Scroll to the bottom.
- Select Settings.
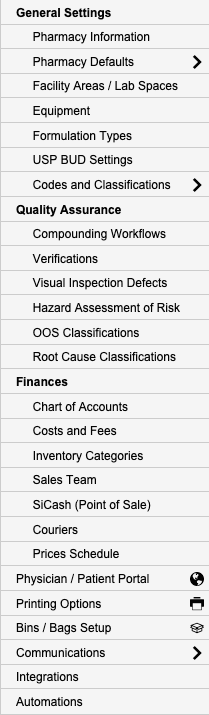
5. Navigate to Codes and Classifications
- Under General Settings, select Codes and Classifications.
- This section allows you to input and manage standard codes for prescription orders.
6. Select SIG Codes
- From the popup list, select SIG Codes.
- The SIG Codes window opens, displaying a list of codes related to medication frequency for labels.

SIG Codes Window Fields
The SIG Codes window displays the following columns:
| Column | Description |
|---|---|
| Code | Unique code identifier for the SIG |
| SIG | Specific instructions written by a Prescriber: such as dosage, frequency, and route in which a pharmacist or technician must place on the prescription label for the patient. |
| Status | Set to Active or Inactive |
Managing SIG Code Status
In the SIG Codes window, you can modify the status of each SIG code:
- Active – The code is available for selection when creating prescriptions.
- Inactive – The code is hidden from prescription options.
Toggle the Status field for each code as needed to control availability.
Note – This process can be applied when editing an existing SIG code or when creating a new SIG code.
Searching SIG Codes
- Use the Search bar located in the upper right corner of the window.
- Search by Code or Label.
- Press Enter/Return to display your search results.
Adding a New SIG Code
- Click the + SIG Code button to create a new code entry.

- The SIG Codes window opens.
- Enter the required information (Code, Frequency Label, Frequency Full Label).
- Click Save to complete the addition.
Editing an Existing SIG Code
- In the SIG Codes window, locate the code you wish to modify.
- Click the settings gear icon at the end of the row.
- Select Edit from the menu options.

- The SIG Codes window opens for that specific code.
- Make your modifications and click Save.
Pharmacy Settings (System Foundation)
Pharmacy Settings provide the foundational templates and defaults required for system operation. These settings must be completed before using other areas of SiCompounding.
Best Practice: Enter all available and required data for each section and subsection to ensure proper system behavior, compliance, and reporting across SiCompounding.
Summary
Maintaining SIG Codes ensures:
- Ensure all SIG Codes are properly configured and status-managed before staff begins creating prescriptions.
- Use standardized abbreviations that are recognized across the pharmacy industry.
- Regularly review and update SIG codes to maintain consistency in prescription instructions.
- Mark deprecated SIG codes as Inactive rather than deleting them to preserve historical records.