
Adding Inventory Categories?
Step-by-step guide for creating Inventory Categories used during inventory counts in SiCompounding.
Adding Inventory Categories?
Inventory Categories are necessary when doing an Inventory count. They group inventory items for counting, reporting, accounting, and integrations (NetSuite, QuickBooks). Proper category mapping ensures accurate financial reporting and simplifies inventory counts.
Step-by-Step Instructions
Open FileMaker Pro
- Click the FileMaker Pro icon to open FileMaker.
- On the next window when FileMaker opens, you will see a large menu bar on the left side of the window. Click on SiCompounding (near the top).
- The next window will have several icons across the middle of the window. Click on Pharmacy to open the Dashboard.
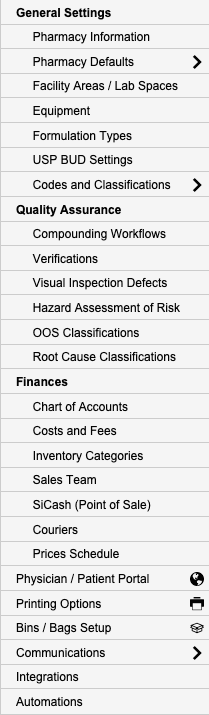
- There is a blue sidebar menu on the left. Select Settings (located at the bottom of the blue sidebar).
- Under Finances, select Inventory Categories.
Inventory Categories Window (Overview)
The Inventory Categories window shows a list of Category records and these columns:

- Sort — Numeric display order
- Category Name — Label used across SiCompounding
- Description — Category details
- Status — Active | Inactive
Click + Inventory Category to open the Categories Information popup and create a new record.

Fields Table
| Field | Description | Example |
|---|---|---|
| Sort | Numeric sort order for display | 10 |
| Name | Category name used in UI and reports | Prescription Supply |
| NetSuite Product Item Category | NetSuite mapping (dropdown) | Pharmaceuticals |
| QuickBooks Product Item Category | QuickBooks mapping (dropdown) | Inventory Items |
| SIC Acct Asset | General ledger asset account mapping (dropdown) | 1500 Inventory |
| SIC Acct COGS | Cost of Goods Sold account mapping (dropdown) | 5000 COGS |
| SIC Acct Income | Income account mapping (dropdown) | 4000 Sales |
| Description | Free-text details that describe the category | Controlled medications and supplies |
| Status | Active or Inactive flag to enable/disable category | Active |
Create / Edit / Delete
- Create: Click + Inventory Category to open the Categories Information popup, fill fields, then click Save.
- Edit: Click the gear (⚙) icon next to a Category and choose Edit. Modify fields and click Save.
- Delete: Click the gear (⚙) icon and choose Delete. Confirm deletion if prompted.
Search
Use the search bar in the upper-right to find categories by Name or Description. Type your query and press Enter/Return to run the search.
Best Practices
- Keep category names short and consistent with your accounting system to simplify integrations.
- Populate NetSuite and QuickBooks mappings during initial setup to avoid reconciliation issues later.
- Prefer setting unused categories to Inactive rather than deleting to preserve historical references.
- Use the Sort field to place frequently used categories near the top of the list.
Pharmacy Settings (System Foundation)
Pharmacy Settings provide the foundational templates and defaults required for system operation. These settings must be completed before using other areas of SiCompounding.
Best Practice: Enter all available and required data for each section and subsection to ensure proper system behavior, compliance, and reporting across SiCompounding.
This completes the guide for Adding Inventory Categories in SiCompounding.