
How can I update Notifications?
Manage and update notification settings in SiCompounding, including editing notification content and viewing change logs.
Overview
Notifications in SiCompounding let you manage automated emails and system alerts used by your pharmacy. This document shows how to open the Notifications window, search for records, edit Email/Subject/Body, and view change logs.
Step-by-Step Instructions
Open FileMaker Pro
- Click the FileMaker Pro icon to open FileMaker.
- In the left menu bar click SiCompounding (near the top).
- In the main window click Pharmacy to open the Dashboard.
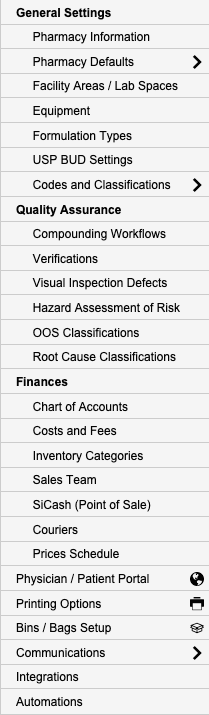
- From the blue sidebar menu, select Settings (located at the bottom).
- After the Bins/Bags Setup, select Communications and choose Notifications from the dropdown.
Notifications Window
The Notifications window displays a list of configured notifications with the following columns:

| Column | Description |
|---|---|
| Name | Notification subject or display name |
| Emails | Email address used for the notification |
| Status | Active or Inactive status |
| Actions | Gear icon to access Edit and Change Logs options |
Search
- Use the search bar in the upper-right to find notifications by Code, Name, or ISO.
- Press Enter/Return to execute the search and display results.
Actions (gear icon)
Click the gear (settings) icon in the Actions column for two options:
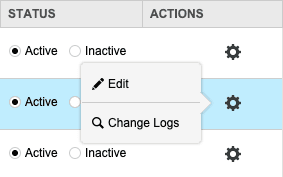
- Edit — Open the Notification Information window to change Email, Subject, and Body.
- Change Logs — Open the Record Modification Log to view all changes made to that notification.
Editable Fields
When editing a notification, you can modify the following fields:
| Field | Description |
|---|---|
| Recipient email address or email template field | |
| Subject | Email subject line |
| Body | Email message content or template variables |
Step-by-step: Edit a Notification
- In the Notifications list locate the notification you want to update.
- Click the gear (settings) icon in the Actions column and choose Edit.

- The Notification Information window opens. Update one or more of the following fields:
- Email — modify recipient email address or template reference.
- Subject — edit the subject line.
- Body — update the message content or template variables.
- Click Save after all data has been entered and changes are complete.
Viewing Change Logs
- Click the gear (settings) icon in the Actions column and select Change Logs.
- The Record Modification Log window opens and displays a list of all changes made to that notification, including timestamps and user details.
- Click the X in the upper-right corner to close the log window and return to the Notifications list.
Best Practices
- Use descriptive
Namevalues so notifications are easy to find. - Test edits in a non-production environment before deploying to live workflows.
- Review the change logs after updates to confirm the correct changes were applied.
Pharmacy Settings (System Foundation)
Pharmacy Settings provide the foundational templates and defaults required for system operation. These settings must be completed before using other areas of SiCompounding.
Best Practice: Enter all available and required data for each section and subsection to ensure proper system behavior, compliance, and reporting across SiCompounding.
This completes the guide for Communications Notifications in SiCompounding.
What is in Communications Templates?
Step-by-step guide to creating, editing, and managing communication templates in SiCompounding for patients, physicians, or internal use.
Maintaining System Alerts?
Step-by-step guide to manage and maintain system alerts in SiCompounding for compliance, safety, and quality control.